GIMP is an open-source software often used as an Adobe Photoshop alternative. It is most often used by graphic designers. GIMP is free photo editor and very light weight software for PC if we compared it to Adobe Photoshop.
Moreover, there are times when you would want to delete the background of an image, it could be for various other reasons. That is why I have written this article explaining 3 ways on how to make an image transparent in GIMP.
Make an Image Transparent in GIMP
Table of Contents
The are 3 easy ways to remove the background are as follows;
Using Fuzzy Select Tool
Using Layer Mask Technique
Using Path Tool
Make an Image Transparent in GIMP by Using Fuzzy Select Tool
First of all you need to understand when to use the Fuzzy Select Tool. This tool is used quite often by designers when they have an image with a single background that needs to get transparent.
The background of the image can be of any color, it need not be black or white.
The steps to accomplish this are as follows;
- Open the Image
- Add an Alpha Channel
- Select the Background
- Delete the Background
- Remove Selection
- Export the Image
Let’s look into all the steps in more detail.
Step 1: Open the Image
To open the Image you will first need to launch GIMP software on your computer. Then Load the image by going to the option File ->Open
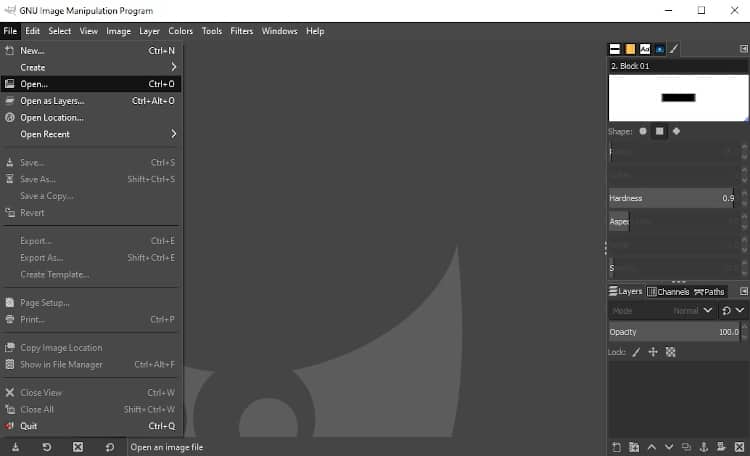
Now we will load the image by clicking on Open.
Step 2: Add an Alpha Channel
If you want to make the image transparent then it’s required to add an Alpha Channel.
What is an Alpha Channel?
All images are a mix of three primary colors that are Red, Green, and Blue. In a 32-bit graphics system, each 8-bit channel is for Red, Green, and Blue. The remaining 8-bit is the alpha channel.
Therefore, in easy terms, Alpha Channel is a mask that specifies how a pixel’s color has to merged with another pixel when one pixel is on the top of another, representing the degree of transparency of a color.
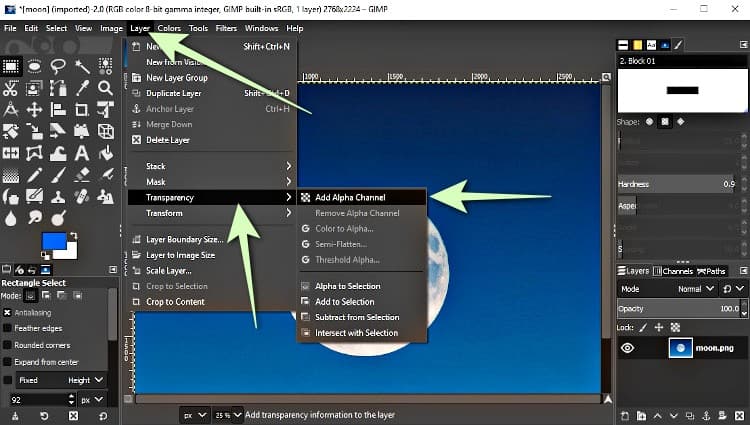
There are two ways to add an Alpha Channel. One way is to click on the Layer Tab then go to Transparency option and finally select Alpha Channel. [Layer >Transparency >Add Alpha Channel]
Another option to add Alpha Channel is from the Image Layer. Just right-click on the Image Layer and select Add Alpha Channel as shown in the below image.
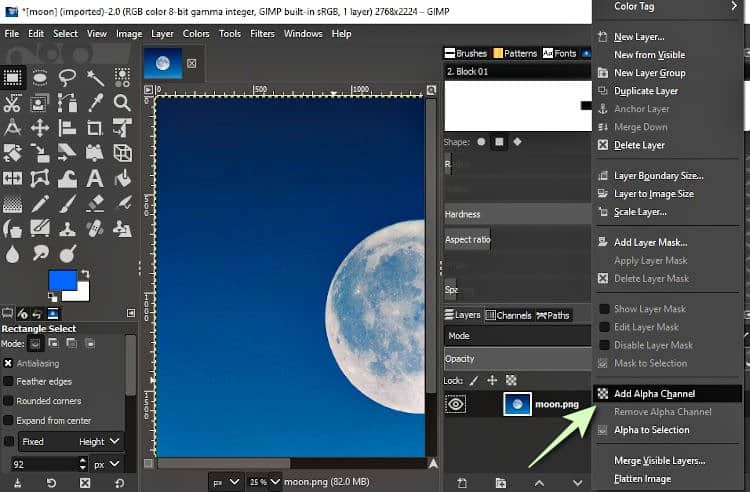
To verify if a layer has Alpha Channel or not, simply check the name in the layer. If the Layer has no Alpha Channel the image name will be in Bold, but if Alpha Channel has been added then the name of the image will be normal.

Step 3: Select the Background
After adding the alpha channel, you need to select the background. Do that by selecting the Fuzzy Select Tool. This tool can be selected by the Left Sidebar or by clicking on the Tools tab.

After selecting the Fuzzy Select Tool click on the background that you want to remove. You will see some ant lines going through the image.
For removing the background completely you will have to adjust the Threshold parameter under the Fuzzy Select options. Here I have set the threshold to 80.9.
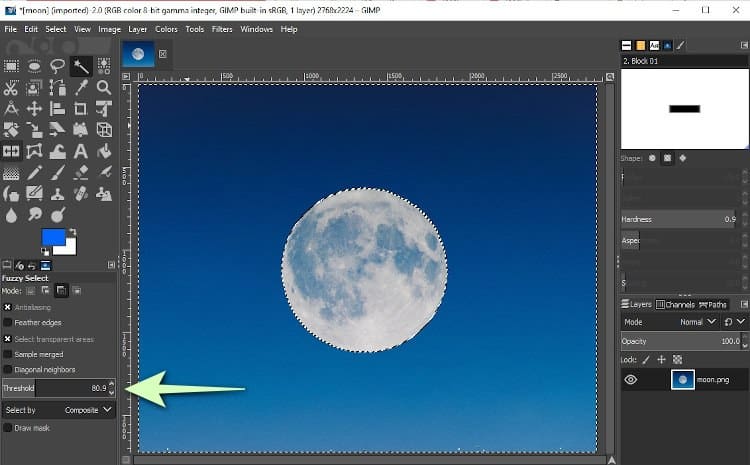
Note: This value purely depends upon the size of the image, you will have to adjust it accordingly. Just make sure there are no ant lines running on the object which you do not want to delete.
Step 4: Delete the Background
Once the selection has been made and you have perfectly adjusted the threshold accordingly. Then simply press the key Delete to get rid of the background.
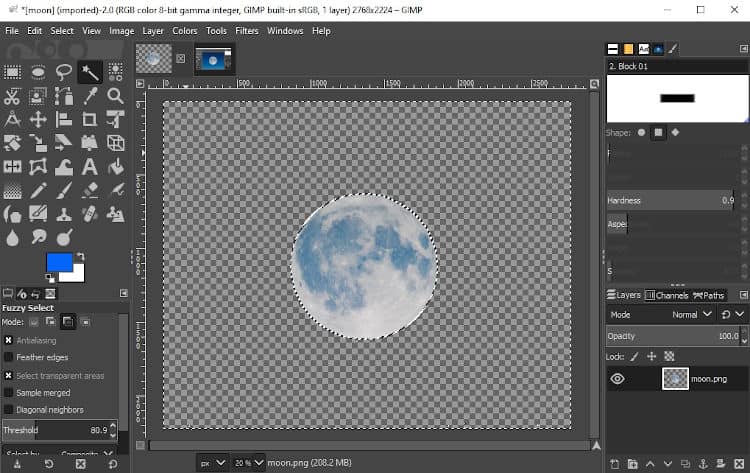
Step 5: Remove the Selection
After deleting the background you will need to dismiss the selection. For that you can either right-click anywhere on the image or simply click on the Select tab to further click on None. [Select > None]
Step 6: Export the Image
Any image with a transparent background must be saved in either PNG or GIF format. It is very important to understand that images do not get saved directly in GIMP until and unless you export them.
For exporting the transparent background image, you will need to go to the File tab and then followed by Export As. [File à Export As]
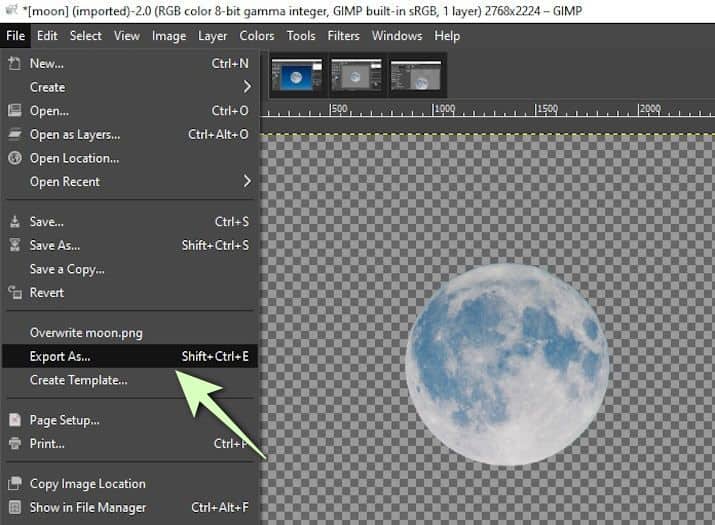
This is how you use the Fuzzy Select Tool to remove the background and making the image transparent in GIMP.
Also Read: What is Difference Between Raster And Vector Images
Make an Image Transparent in GIMP by Using Layer Mask
Another simple technique to make the background transparent of an image is by using layer mask.
Steps involved in this method are as follows;
- Open the Image in GIMP
- Add Alpha Channel
- Add Duplicate Layer
- Desaturate the Layer
- Adjust Brightness/Contrast Level
- Color the Areas and Invert the Colors
- Copy the Layer; Turn off Duplicate Layer
- Add a Layer Mask
- Paste the Duplicate Layer
- Anchor the Floating Layer
- Export the Image
Let’s look into all the steps in more detail.
Step 1: Open the Image in GIMP
Launch the GIMP software on your computer and then go to File tab. Followed by that click on Open. Navigate and load the image.
Step 2: Add Alpha Channel
Similar to the steps mentioned above, add Alpha Channel by right-clicking on the name of the layer on the right-hand side.
Step 3: Add a Duplicate Layer
For adding a Duplicate Layer you need to right-click on the name of the layer and click on Duplicate Layer.
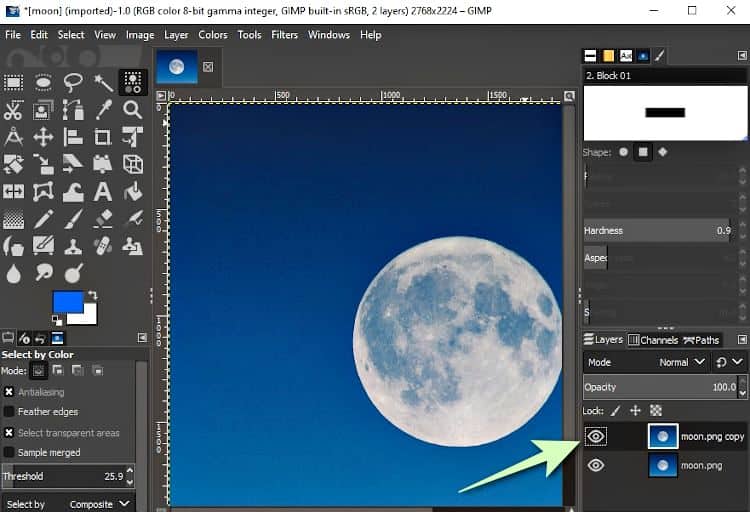
Once you have the Duplicate Layer, you will see a new layer with same name ending with word “copy”.
Step 4: Desaturate the Layer
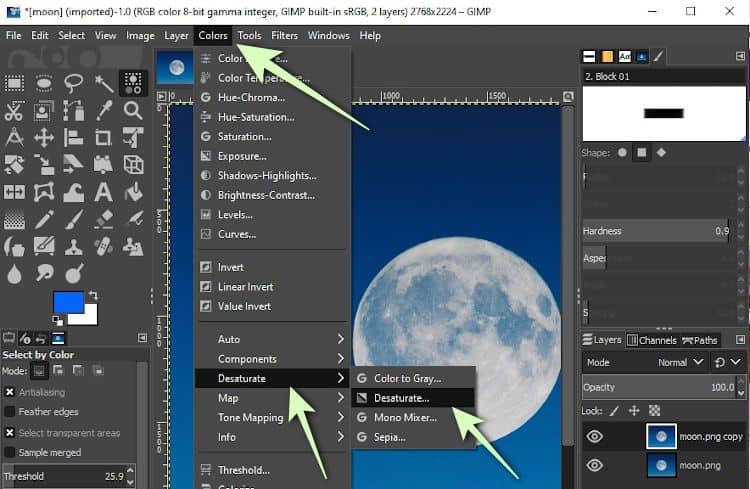
You have to desaturate the Duplicate Layer not the original layer. Make sure that the Duplicate Layer has been selected. Then go to Colors followed by Desaturate.
Step 5: Adjust Brightness and Contrast Level
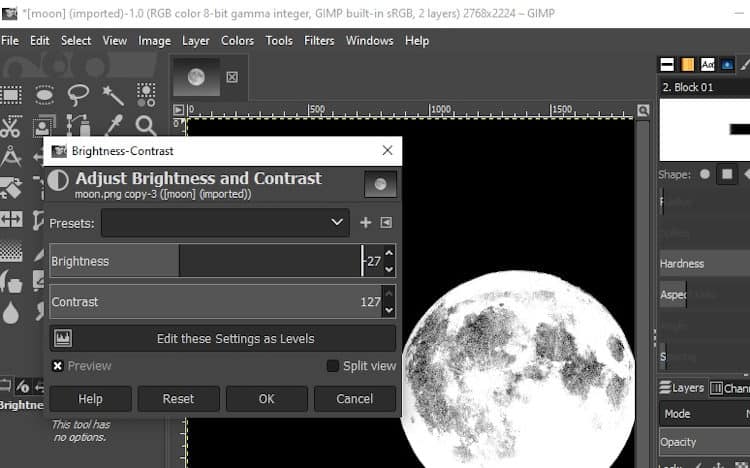
Now, from the Colors Tab select Brightness – Contrast option. One dialogue box will appear in front of you. Within that dialogue box you have to increase the Contrast to the Maximum and Adjust the Brightness in such a way that the image almost turns to Black and White.
Step 6: Color the Areas and Invert the Colors
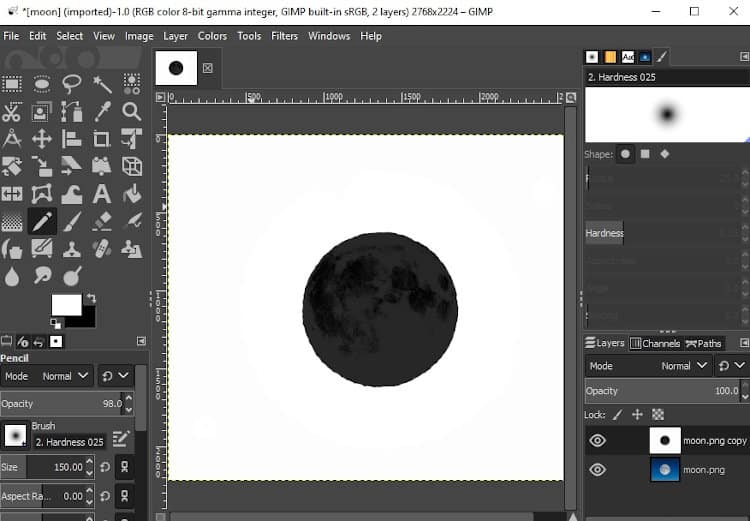
After that select the pencil tool. I have kept the size as 400 you can adjust accordingly. Select black color from the left sidebar. You will have to color the areas that you want to keep with black color and remove the rest of the image by white pencil.
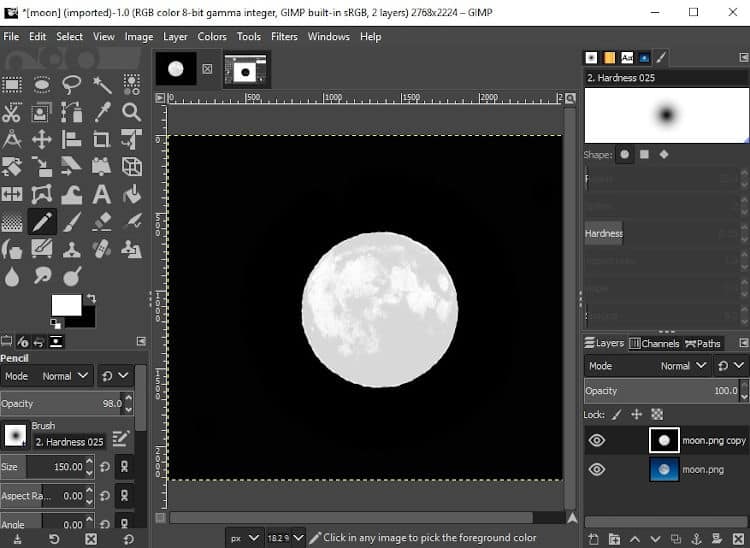
After completing the coloring go to Colors tab again and now select the option Invert.
Step 7: Copy the Layer; Turn off Duplicate Layer
For copying the layer go to Edit tab and select Copy. After copying the layer, Turn Off the Duplicate Layer by clicking on “eye icon”
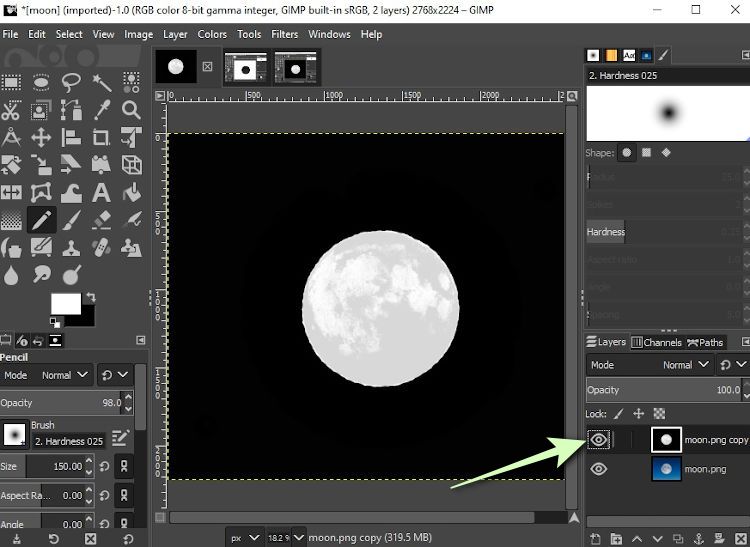
Step 8: Add a Layer Mask
Now, select the original layer. Go to the Layer tab, select Mask, and click on Add Layer Mask.
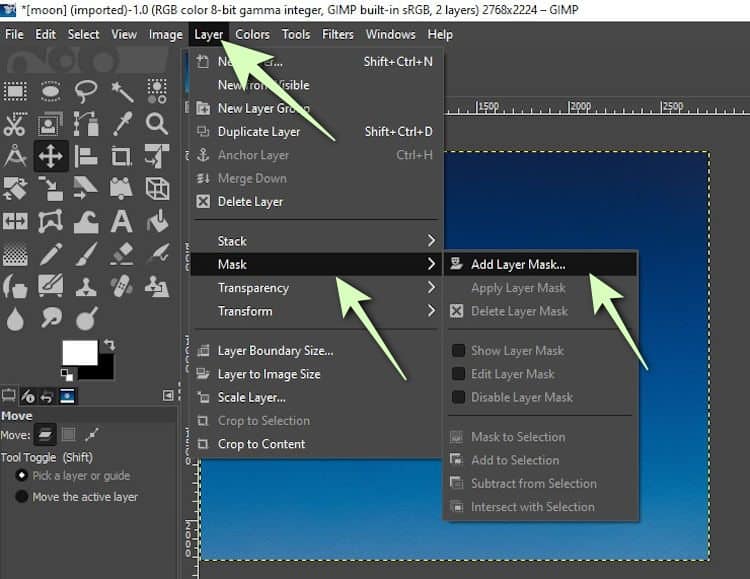
A dialog box will open. Within that box select White (full opacity) option and hit Add.
Step 9: Paste the Duplicate Layer
Now paste the Duplicate Layer and your image will be floating. Click on the Anchor icon and that will anchor the floating layer.
Step 10: Export the Image
Now export the image as done previously. Go to File then select Export As.
This method is a little tedious but works really well when you an image with multiple colors.
Make an Image Transparent in GIMP by Using the Path Tool
This technique will involve the use of the Path Tool.
The steps involved are as follows;
- Load the Image
- Add Alpha Channel
- Use the Path Tool
- Invert the Selection
- Delete the Background
- Export the Image
Let’s look into all the steps in more detail.
Step 1: Load the Image
Launch the GIMP software on your computer and go to File tab. Click on Open. Navigate and load the image.
Step 2: Add Alpha Channel
For adding Alpha Channel, simply right-click on the name of the layer and select Add Alpha Channel.
Step 3: Use the Path Tool
For selecting the Path Tool, select it from the left sidebar.
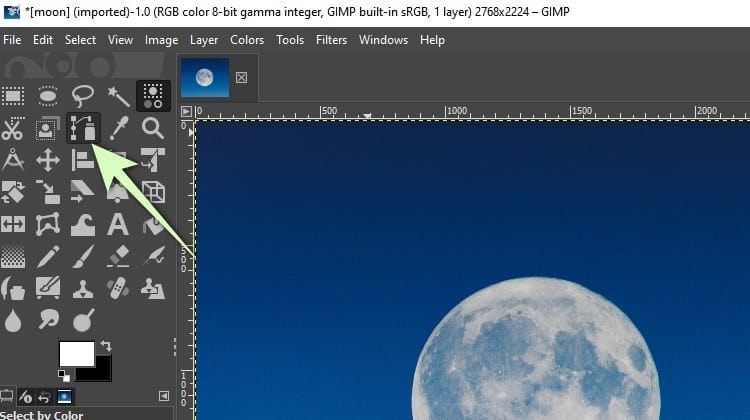
By using this tool, draw the outline of the image that you want to keep. This has to be done manually by the mouse.
Before completing the path line boundary make sure to match the start and the end point by clicking on the control key.
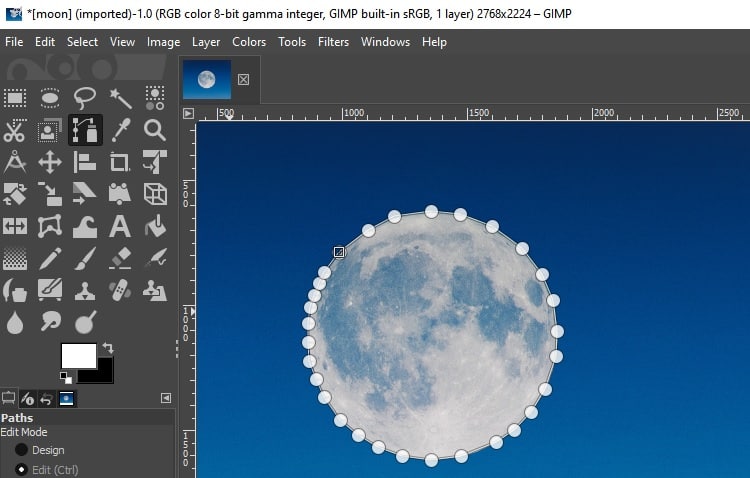
Note: If there are some minor errors while doing so, then just press Ctrl+Z to undo the error.
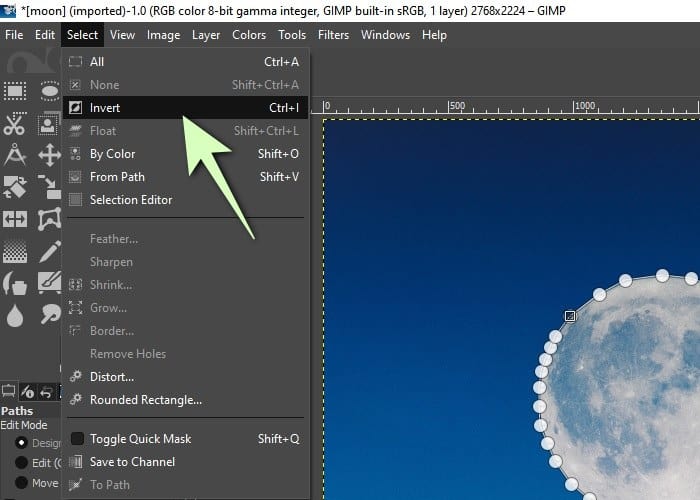
Step 4: Invert the Selection
After you have successfully created the path by using the Path Tool, you will now need to invert the selection so that you can remove the background and make the image transparent.
For inverting the selection go to Select Tab and then click on Invert. [Select à Invert]
Step 5: Delete the Background
Now that selection has been inverted, its time we delete the background by pressing the delete button.
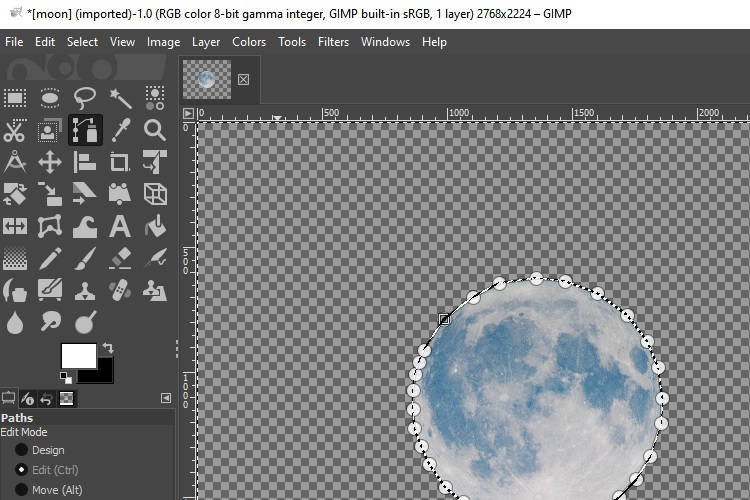
Once the background has been deleted, you can get rid of the selection by simply on the Select Tab and then choosing the option None.
Step 6: Export the Image
Now, just like before, export the image by going to the File tab and then clicking on Export As.
Conclusion
So, these are all the ways how to delete the background and make image transparent in GIMP. These techniques require some effort and patience.
They are quite often practiced by graphic designers but I have tried to make this article very simple and effective. So, that anyone can make use of these methods and achieve their desired results.